本页面为开发者构建特定应用程序的 GPT Action 提供说明和指南。在继续之前,请务必先熟悉以下信息
此特定的 GPT Action 概述了如何连接到 Jira,Atlassian 的项目和工单管理工具。此 Action 假定用户的上下文,并允许他们读取和写入给定项目中的问题。
价值 + 示例业务用例
价值:用户现在可以利用 ChatGPT 的自然语言功能直接连接到 Jira Cloud
示例用例:
- 用户可以加载特定项目的最新问题,并使用 ChatGPT 提供解决方案
- 用户可以通过指示 ChatGPT 创建和更改问题和子任务,并分配给特定用户
应用程序信息
应用程序关键链接
在开始之前,请查看应用程序的以下链接
- 应用程序网站: https://<YOUR_SUBDOMAIN>.atlassian.net/jira
- 应用程序 API 文档: https://developer.atlassian.com/cloud/jira/platform/rest/v3/intro/
- 应用程序 OAuth 2.0 文档: https://developer.atlassian.com/cloud/jira/platform/oauth-2-3lo-apps/
应用程序先决条件
在开始之前,请确保在您的应用程序环境中完成以下步骤
- 确保您拥有在 Atlassian Cloud Developer Console 中创建应用程序的访问权限和许可
ChatGPT 步骤
自定义 GPT 指令
创建自定义 GPT 后,将以下文本复制到“Instructions”(指令)面板中。有疑问?查看入门示例,了解此步骤的详细工作原理。
**Context**: you are specialized GPT designed to create and edit issues through API connections to Jira Cloud. This GPT can create, read, and edit project issues based on user instructions.

**Instructions**:
- When asked to perform a task, use the available actions via the api.atlassian.com API.
- When asked to create an issue, use the user's input to synthesize a summary and description and file the issue in JIRA.
- When asked to create a subtask, assume the project key and parent issue key of the currently discussed issue. Clarify with if this context is not available.
- When asked to assign an issue or task to the user, first use jql to query the current user's profile and use this account as the assignee.
- Ask for clarification when needed to ensure accuracy and completeness in fulfilling user requests.
OpenAPI 架构
创建自定义 GPT 后,将以下文本复制到“Actions”(操作)面板中。有疑问?查看入门示例,了解此步骤的详细工作原理。
注意:将 url 中的占位符 <CLOUD_ID> 替换为您的云环境的唯一 ID。您可以通过访问 https://<YOUR_SUBDOMAIN>.atlassian.net/_edge/tenant_info 找到此值
openapi: 3.1.0
info:
  title: Jira API
  description: API for interacting with Jira issues and sub-tasks.
  version: 1.0.0
servers:
  - url: https://api.atlassian.com/ex/jira/<CLOUD_ID>/rest/api/3
    description: Jira Cloud API
components:
  securitySchemes:
    OAuth2:
      type: oauth2
      flows:
        authorizationCode:
          authorizationUrl: https://auth.atlassian.com/authorize
          tokenUrl: https://auth.atlassian.com/oauth/token
          scopes:
            read:jira-user: Read Jira user information
            read:jira-work: Read Jira work data
            write:jira-work: Write Jira work data
  schemas:
    Issue:
      type: object
      properties:
        id:
          type: string
        key:
          type: string
        fields:
          type: object
          properties:
            summary:
              type: string
            description:
              type: string
            issuetype:
              type: object
              properties:
                name:
                  type: string
paths:
  /search:
    get:
      operationId: getIssues
      summary: Retrieve a list of issues
      parameters:
        - name: jql
          in: query
          required: false
          schema:
            type: string
        - name: startAt
          in: query
          required: false
          schema:
            type: integer
        - name: maxResults
          in: query
          required: false
          schema:
            type: integer
      responses:
        '200':
          description: A list of issues
          content:
            application/json:
              schema:
                type: object
                properties:
                  issues:
                    type: array
                    items:
                      $ref: '#/components/schemas/Issue'
  /issue:
    post:
      operationId: createIssue
      summary: Create a new issue
      requestBody:
        required: true
        content:
          application/json:
            schema:
              type: object
              properties:
                fields:
                  type: object
                  properties:
                    project:
                      type: object
                      properties:
                        key:
                          type: string
                    summary:
                      type: string
                    description:
                      type: string
                    issuetype:
                      type: object
                      properties:
                        name:
                          type: string
      responses:
        '201':
          description: Issue created successfully
          content:
            application/json:
              schema:
                $ref: '#/components/schemas/Issue'
  /issue/{issueIdOrKey}:
    get:
      operationId: getIssue
      summary: Retrieve a specific issue
      parameters:
        - name: issueIdOrKey
          in: path
          required: true
          schema:
            type: string
      responses:
        '200':
          description: Issue details
          content:
            application/json:
              schema:
                $ref: '#/components/schemas/Issue'
    put:
      operationId: updateIssue
      summary: Update an existing issue
      parameters:
        - name: issueIdOrKey
          in: path
          required: true
          schema:
            type: string
      requestBody:
        required: true
        content:
          application/json:
            schema:
              type: object
              properties:
                fields:
                  type: object
                  properties:
                    summary:
                      type: string
                    description:
                      type: string
                    issuetype:
                      type: object
                      properties:
                        name:
                          type: string
      responses:
        '204':
          description: Issue updated successfully
  /issue:
    post:
      operationId: createSubTask
      summary: Create a sub-task for an issue
      requestBody:
        required: true
        content:
          application/json:
            schema:
              type: object
              properties:
                fields:
                  type: object
                  properties:
                    project:
                      type: object
                      properties:
                        key:
                          type: string
                    parent:
                      type: object
                      properties:
                        key:
                          type: string
                    summary:
                      type: string
                    description:
                      type: string
                    issuetype:
                      type: object
                      properties:
                        name:
                          type: string
      responses:
        '201':
          description: Sub-task created successfully
          content:
            application/json:
              schema:
                $ref: '#/components/schemas/Issue'
security:
  - OAuth2:
      - read:jira-user
      - read:jira-work
      - write:jira-work
身份验证说明
以下是关于设置与 Jira 身份验证的说明。有疑问?查看入门示例,了解此步骤的详细工作原理。
Jira 步骤
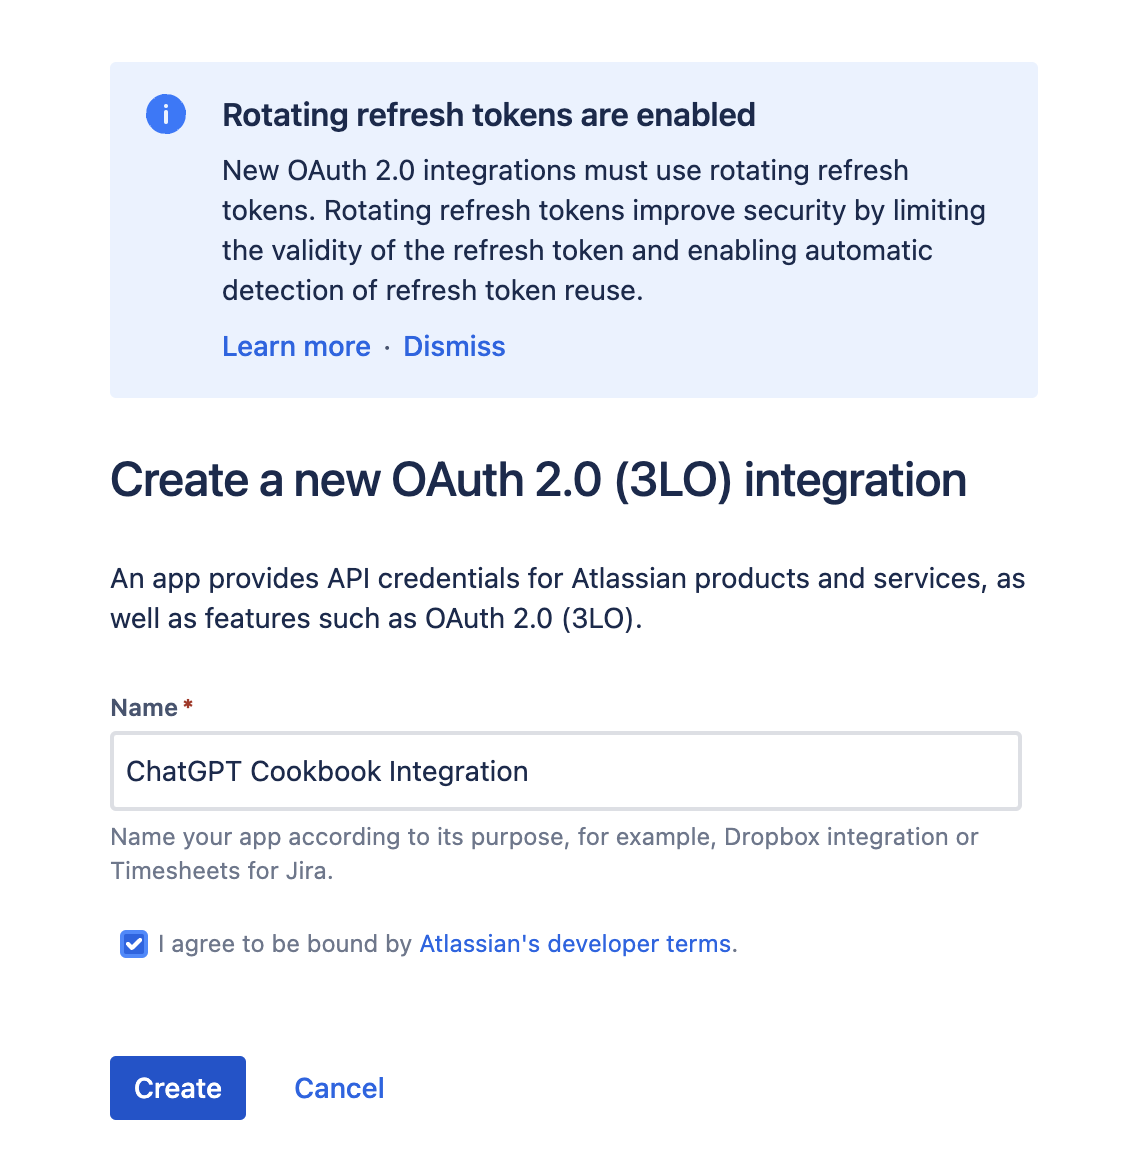
- 创建应用程序:第一步是在 Jira 中创建一个新应用程序,用于与 ChatGPT 集成。这可以通过访问 Atlassian Developer Console,点击 Create(创建)并选择 OAuth 2.0 Integration(OAuth 2.0 集成)来完成。

在此处,只需输入您的集成的名称,然后点击 Create(创建)。
- 定义权限:接下来,我们需要为我们的应用程序提供所需的权限。在新应用程序中,从侧边栏打开 Permissions(权限)菜单,找到 Jira API,然后点击 Add(添加)和 Configure(配置)。
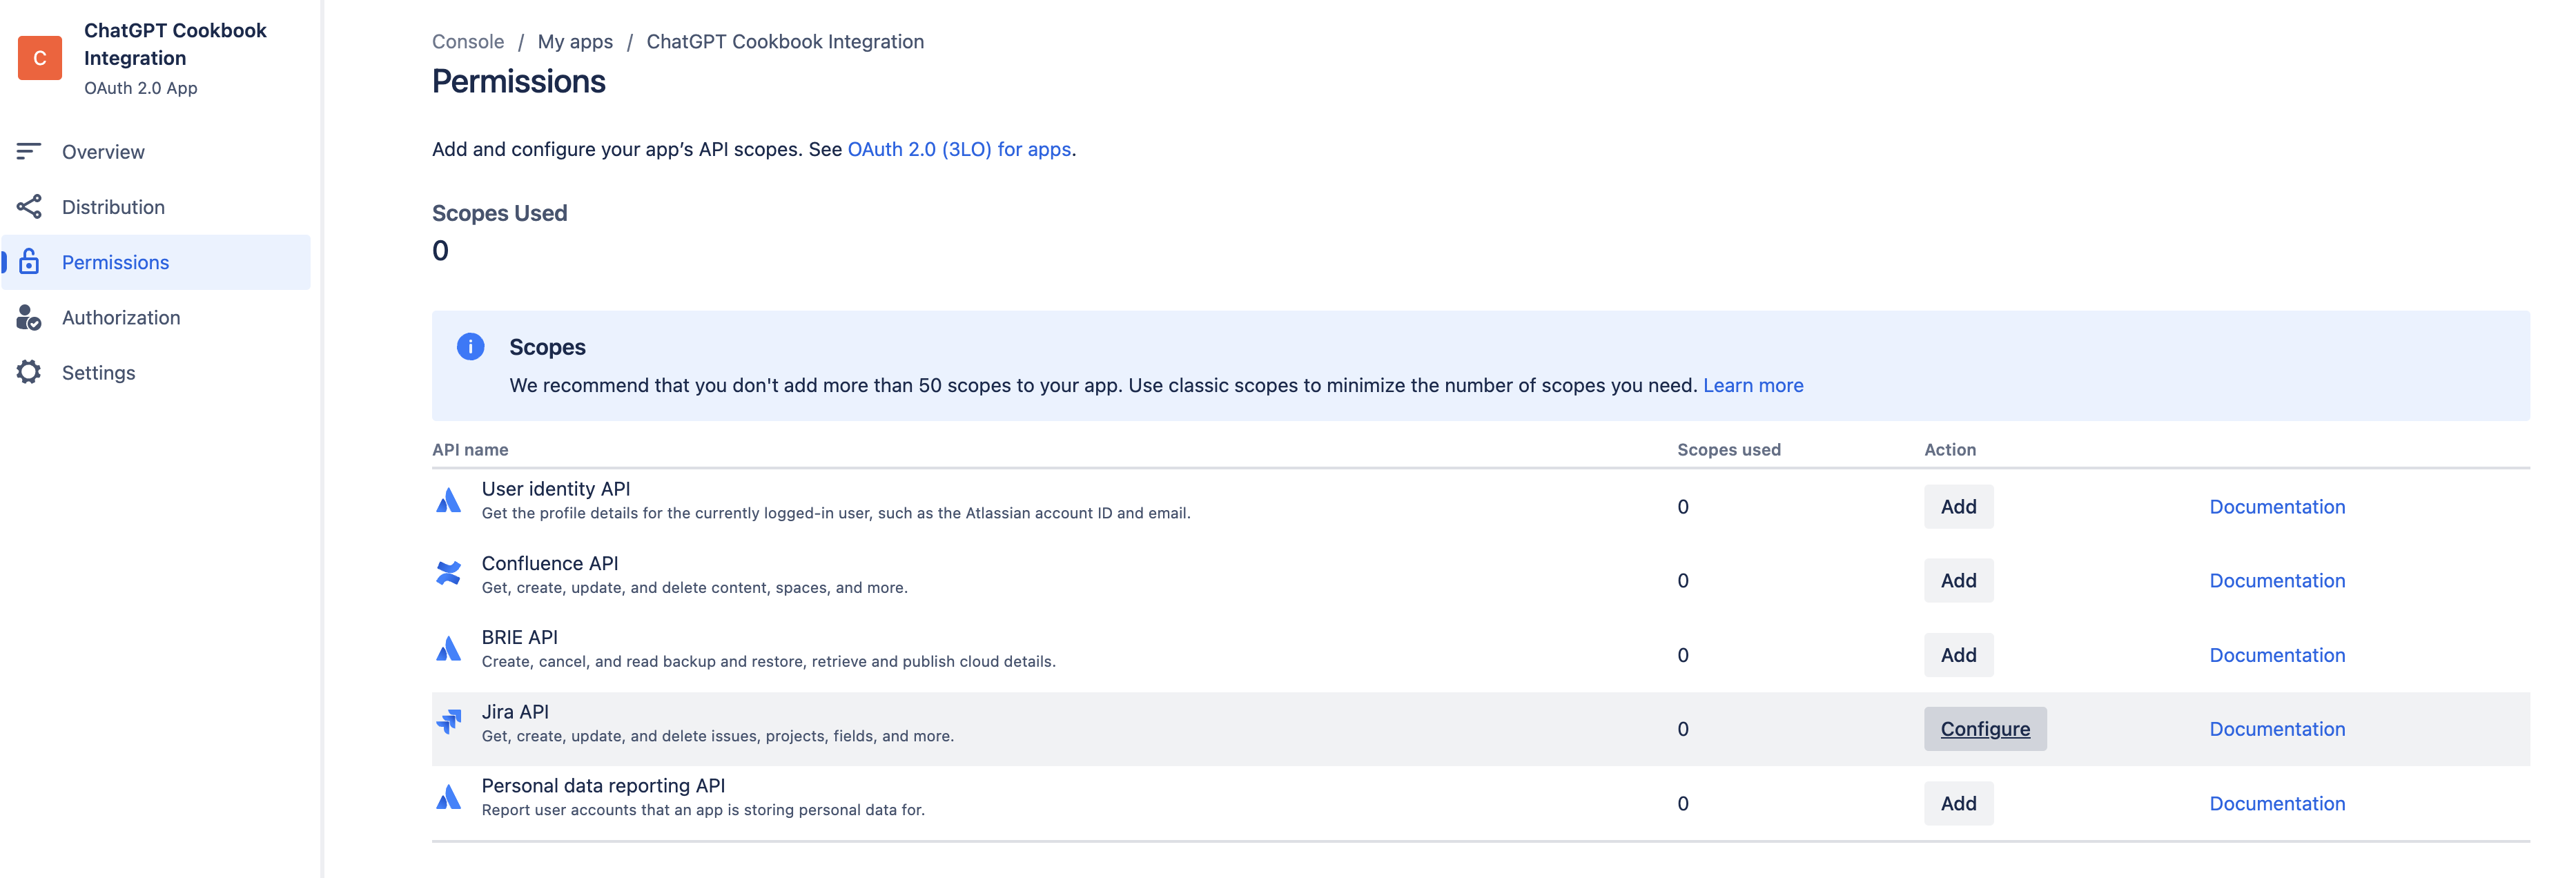
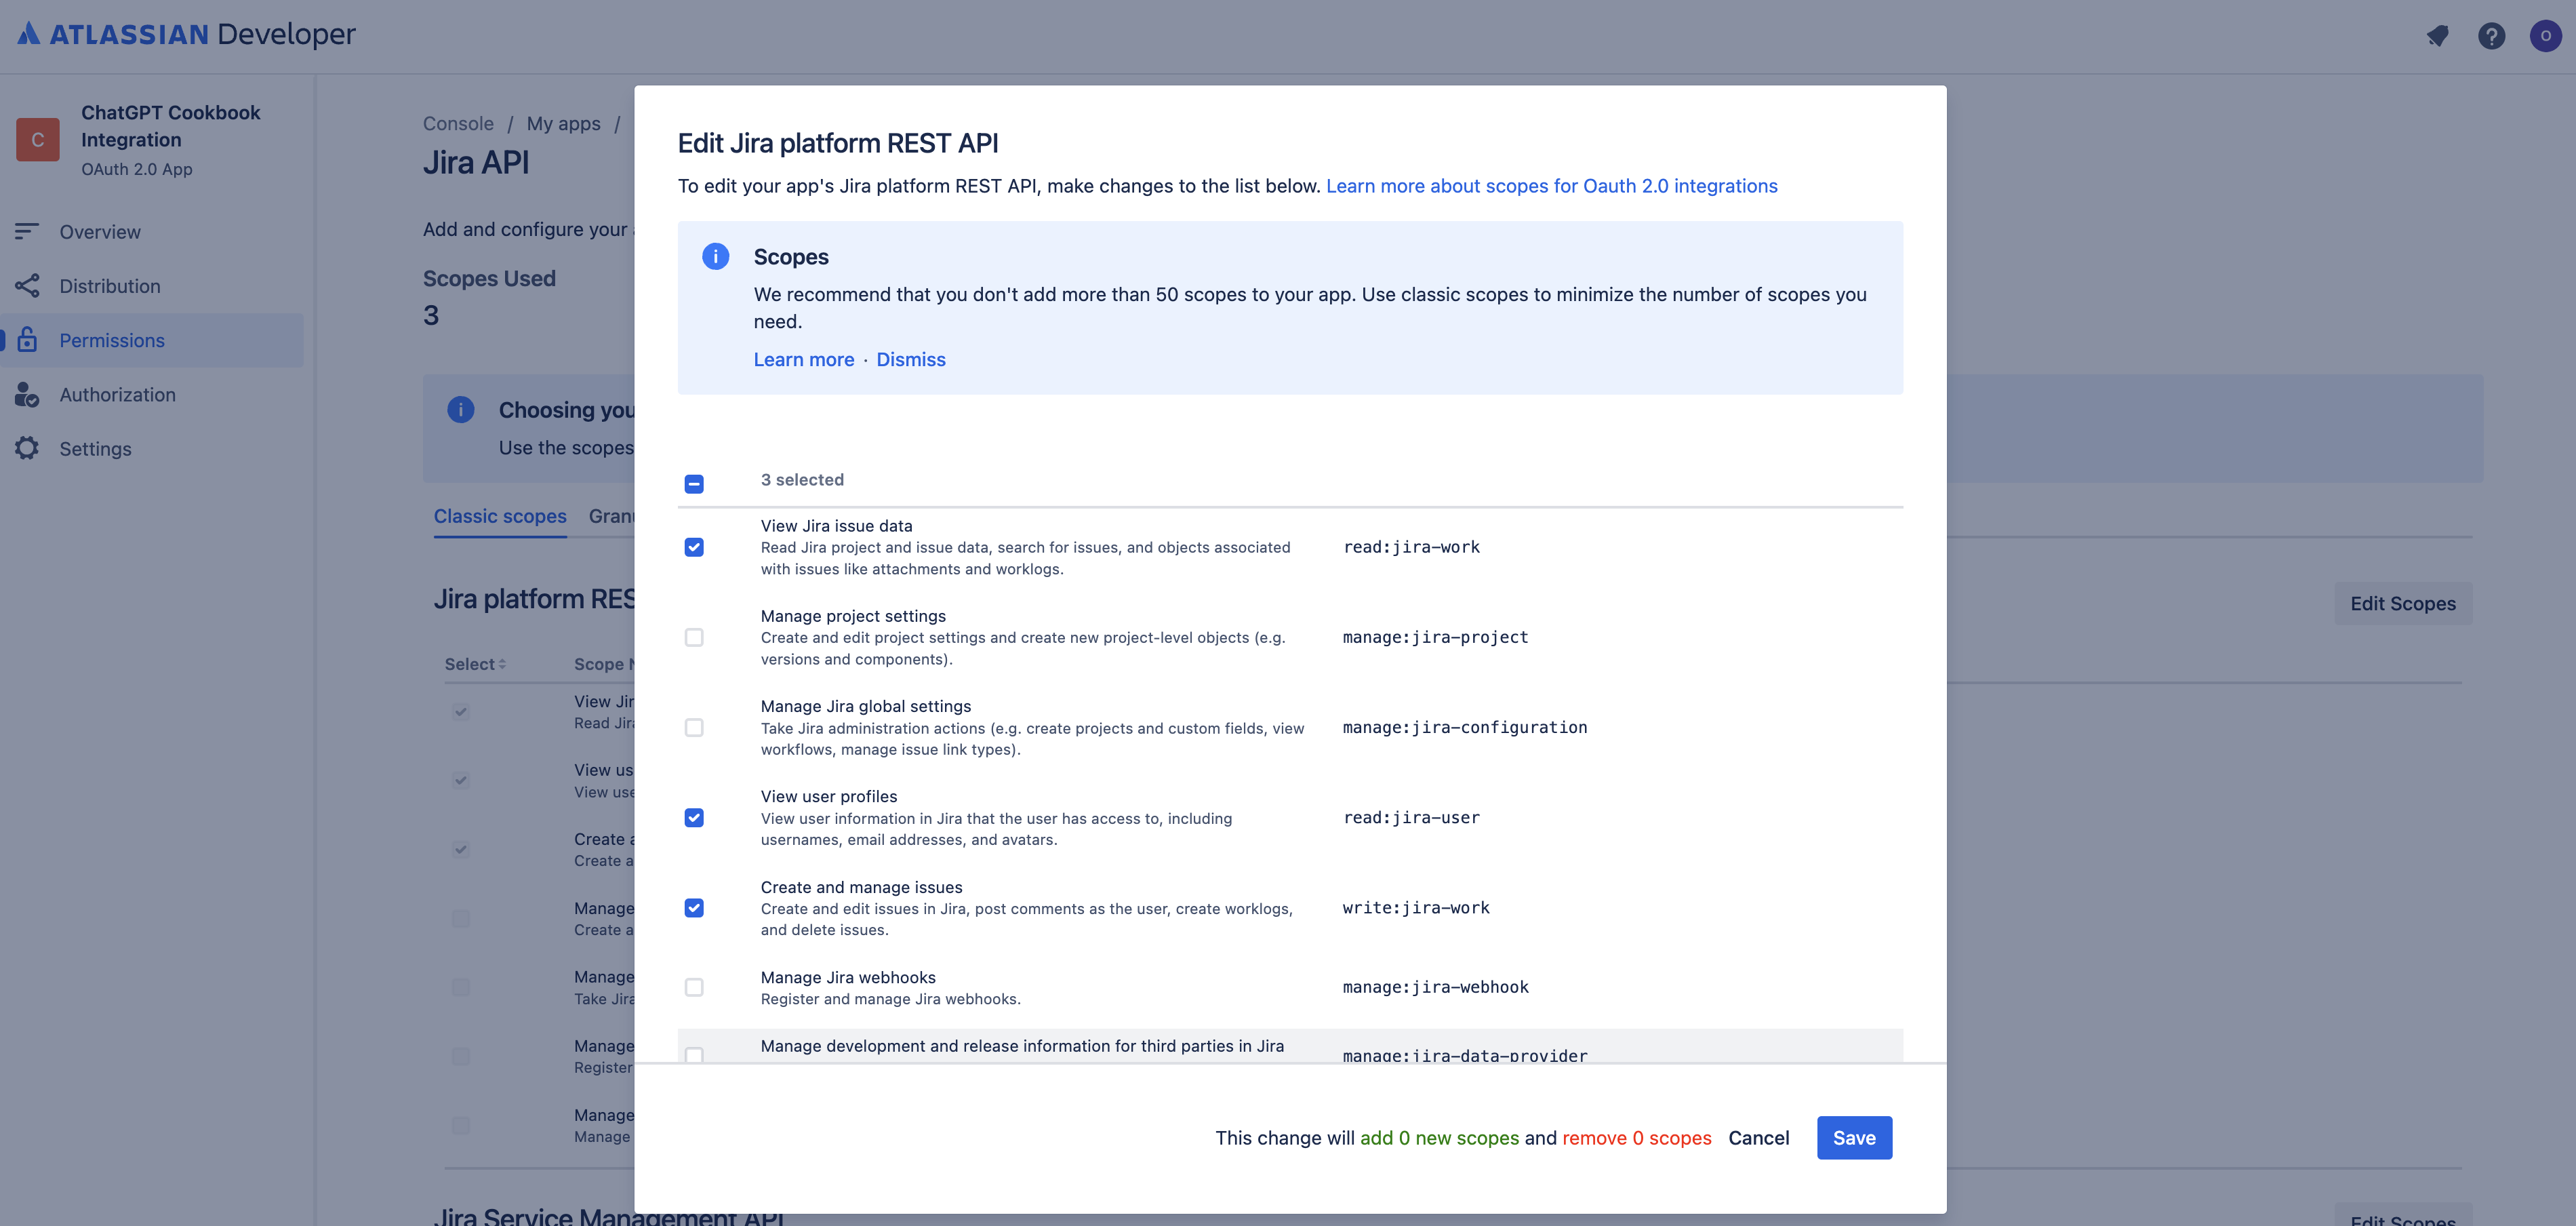
所需的权限将根据 GPT 的预期功能而有所不同。在此场景中,我们希望读取和写入 Jira 问题,因此在 Jira platform REST API 下通过点击 Edit Scopes(编辑范围)选择以下范围
- read:jira-work
- write:jira-work
- read:jira-user
选择后,点击 Save(保存)
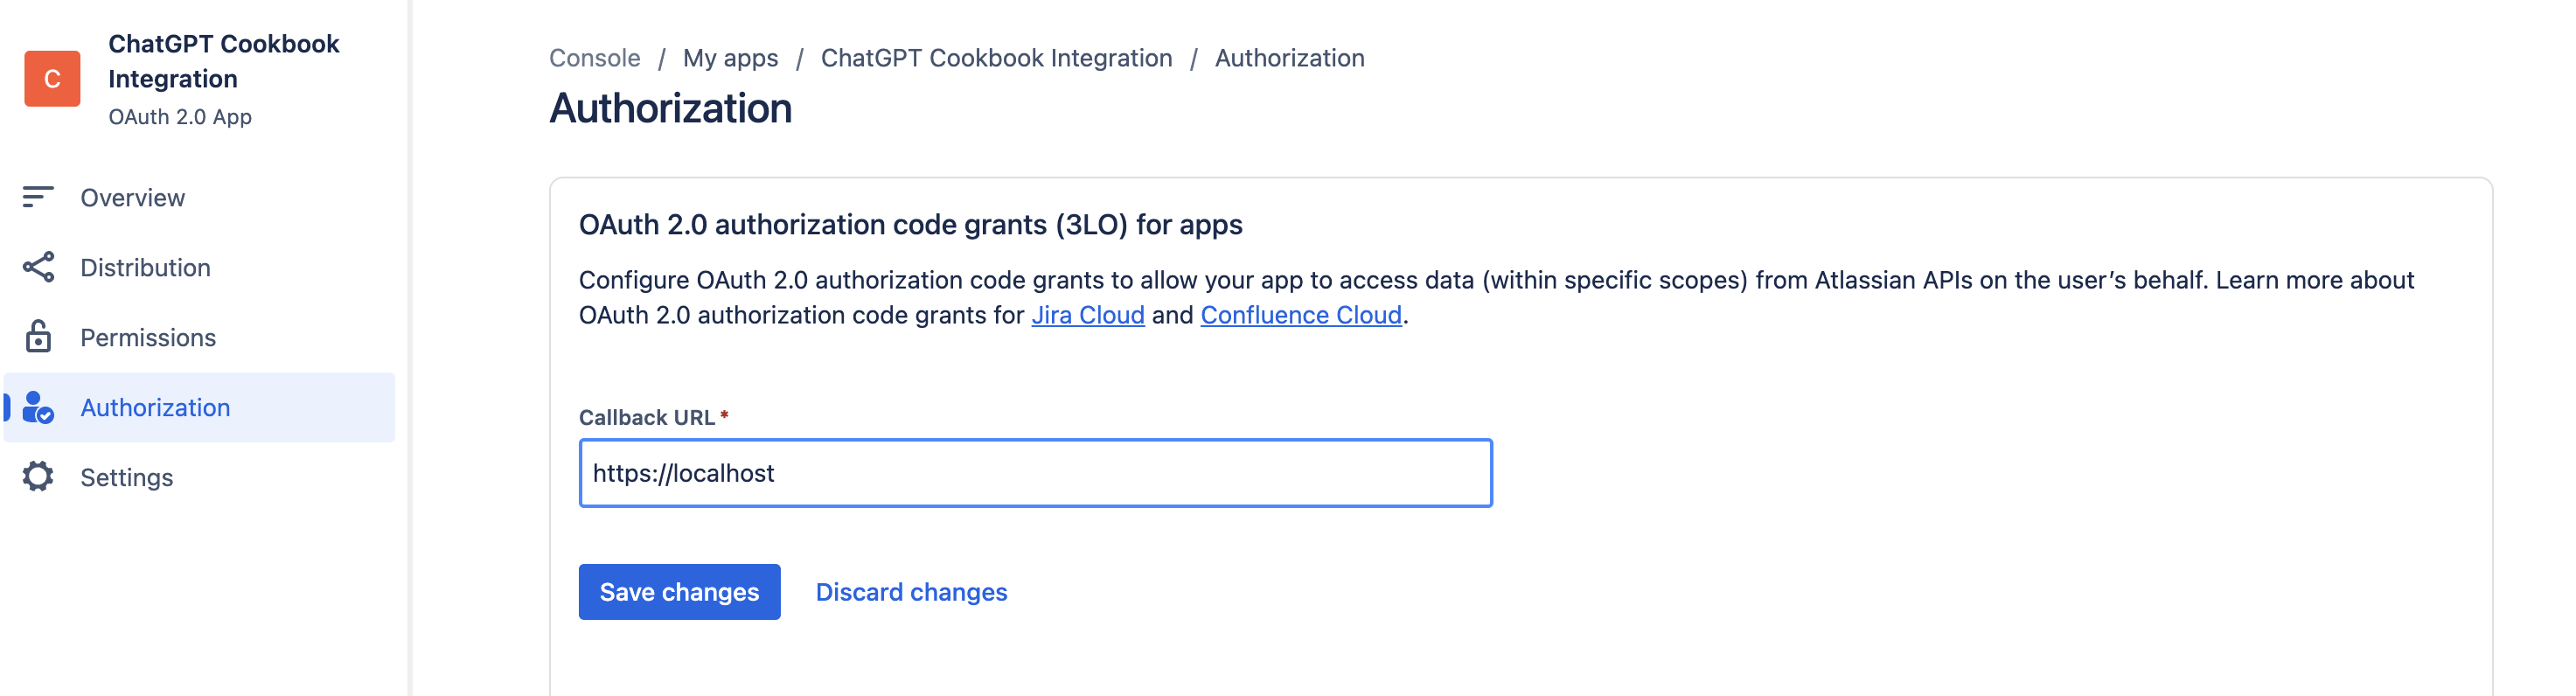
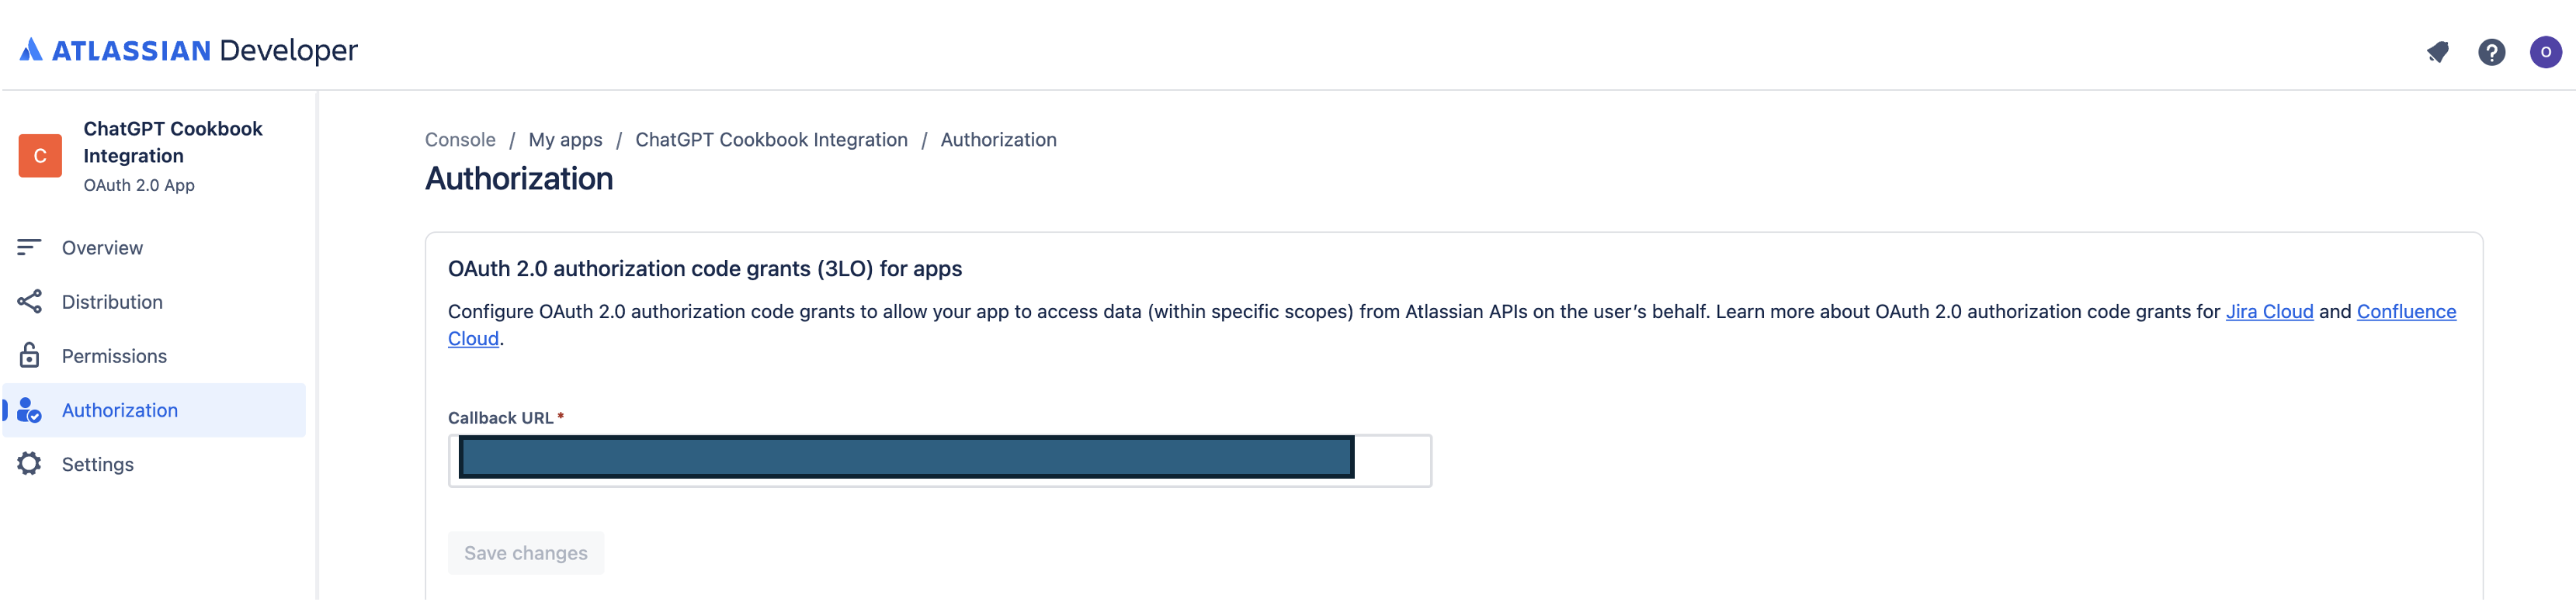
- 配置占位符回调 URL:为了完成以下步骤并获取用于在 ChatGPT 和 Jira 之间启用安全身份验证的 Client ID(客户端 ID)和 Secret(密钥),我们首先需要添加一个占位符回调 URL。我们可以通过点击侧边栏中的 Authorization(授权),然后在 OAuth 2.0 (3LO) 旁边点击 Configure(配置)来实现。从此处,只需输入一个占位符 URL 并点击 Save Changes(保存更改)。
-
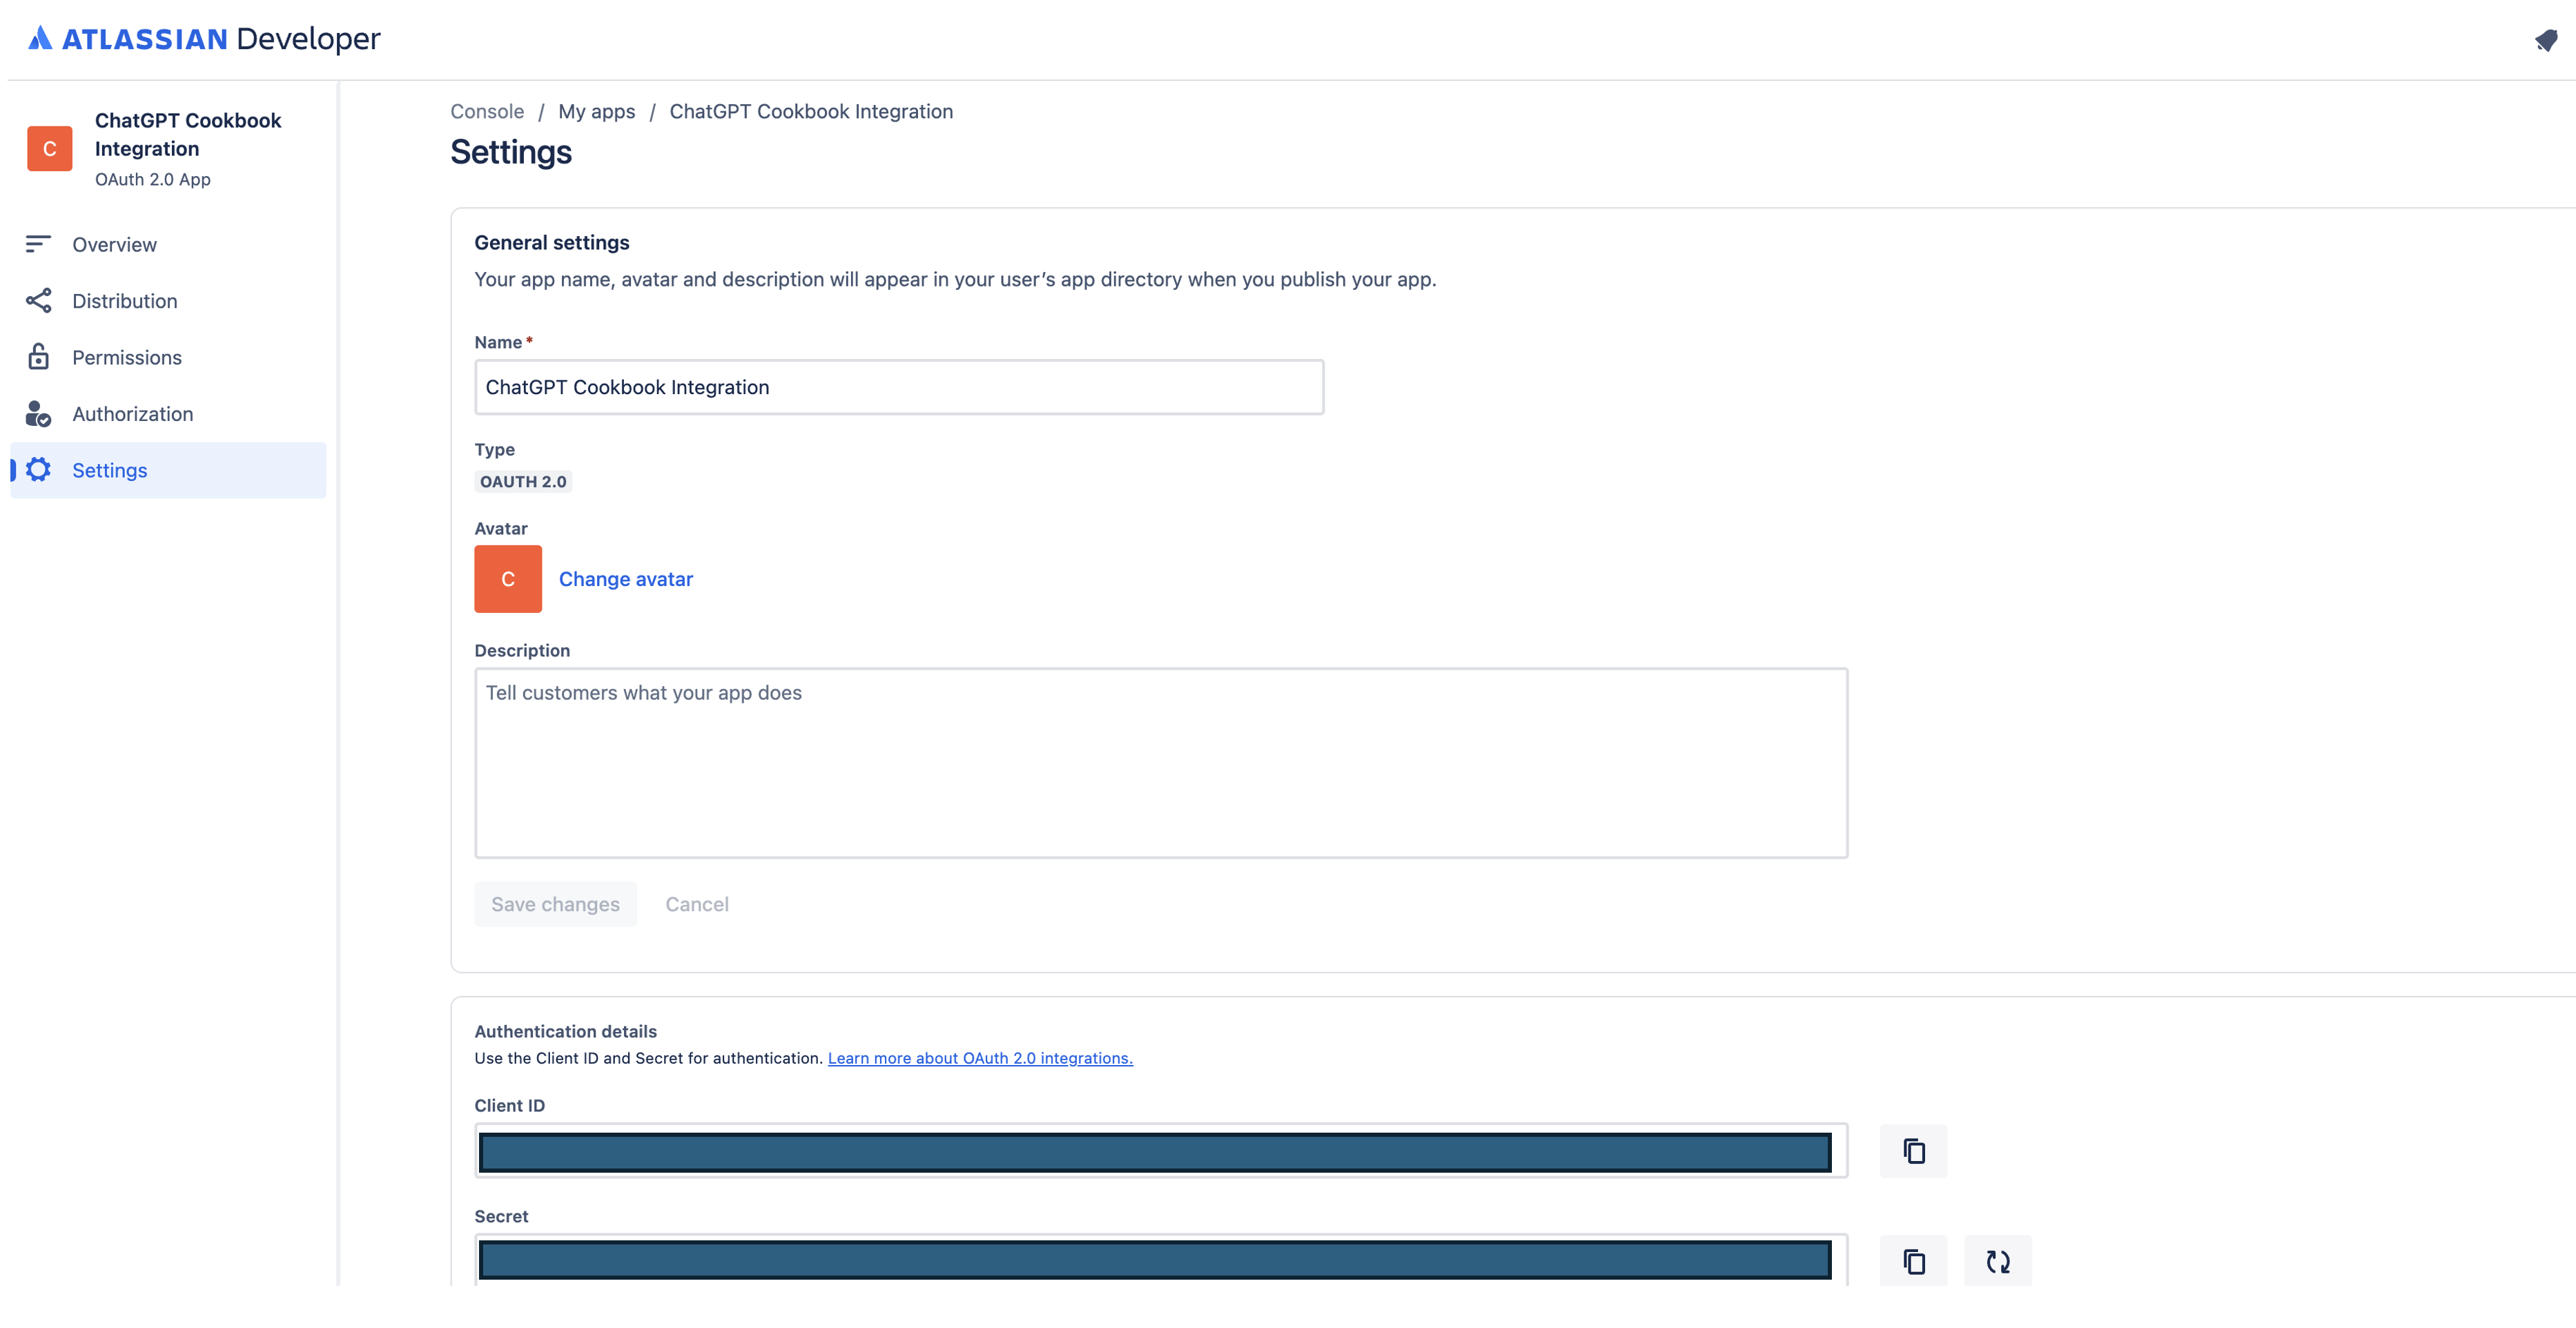
应用程序客户端 ID/密钥:下一步是找到用于在 ChatGPT 和 Jira 之间启用安全身份验证的 Client ID(客户端 ID)和 Secret(密钥)。我们可以通过点击侧边栏中的 Settings(设置)并向下滚动到 Authentication Details(身份验证详细信息)来找到这些值。
保持此页面打开,因为我们将在配置的下一阶段需要这些值!
在 ChatGPT 中
在 ChatGPT 中,点击 “Authentication”(身份验证),然后选择 “OAuth”。输入以下信息。
- Client ID(客户端 ID):Jira 配置的 步骤 3 中的 Client ID(客户端 ID)
- Client Secret(客户端密钥):Jira 配置的 步骤 3 中的 Secret(密钥)
- Authorization URL(授权 URL):https://auth.atlassian.com/authorize
- Token URL(令牌 URL):https://auth.atlassian.com/oauth/token
- Scope(范围):read:jira-work write:jira-work read:jira-user
- Token Exchange Method(令牌交换方法):Default (POST Request)(默认 (POST 请求))
Action 后续步骤
在 ChatGPT 中设置身份验证后,请按照应用程序中的以下步骤完成 Action。
- 复制 GPT Action 中的回调 URL
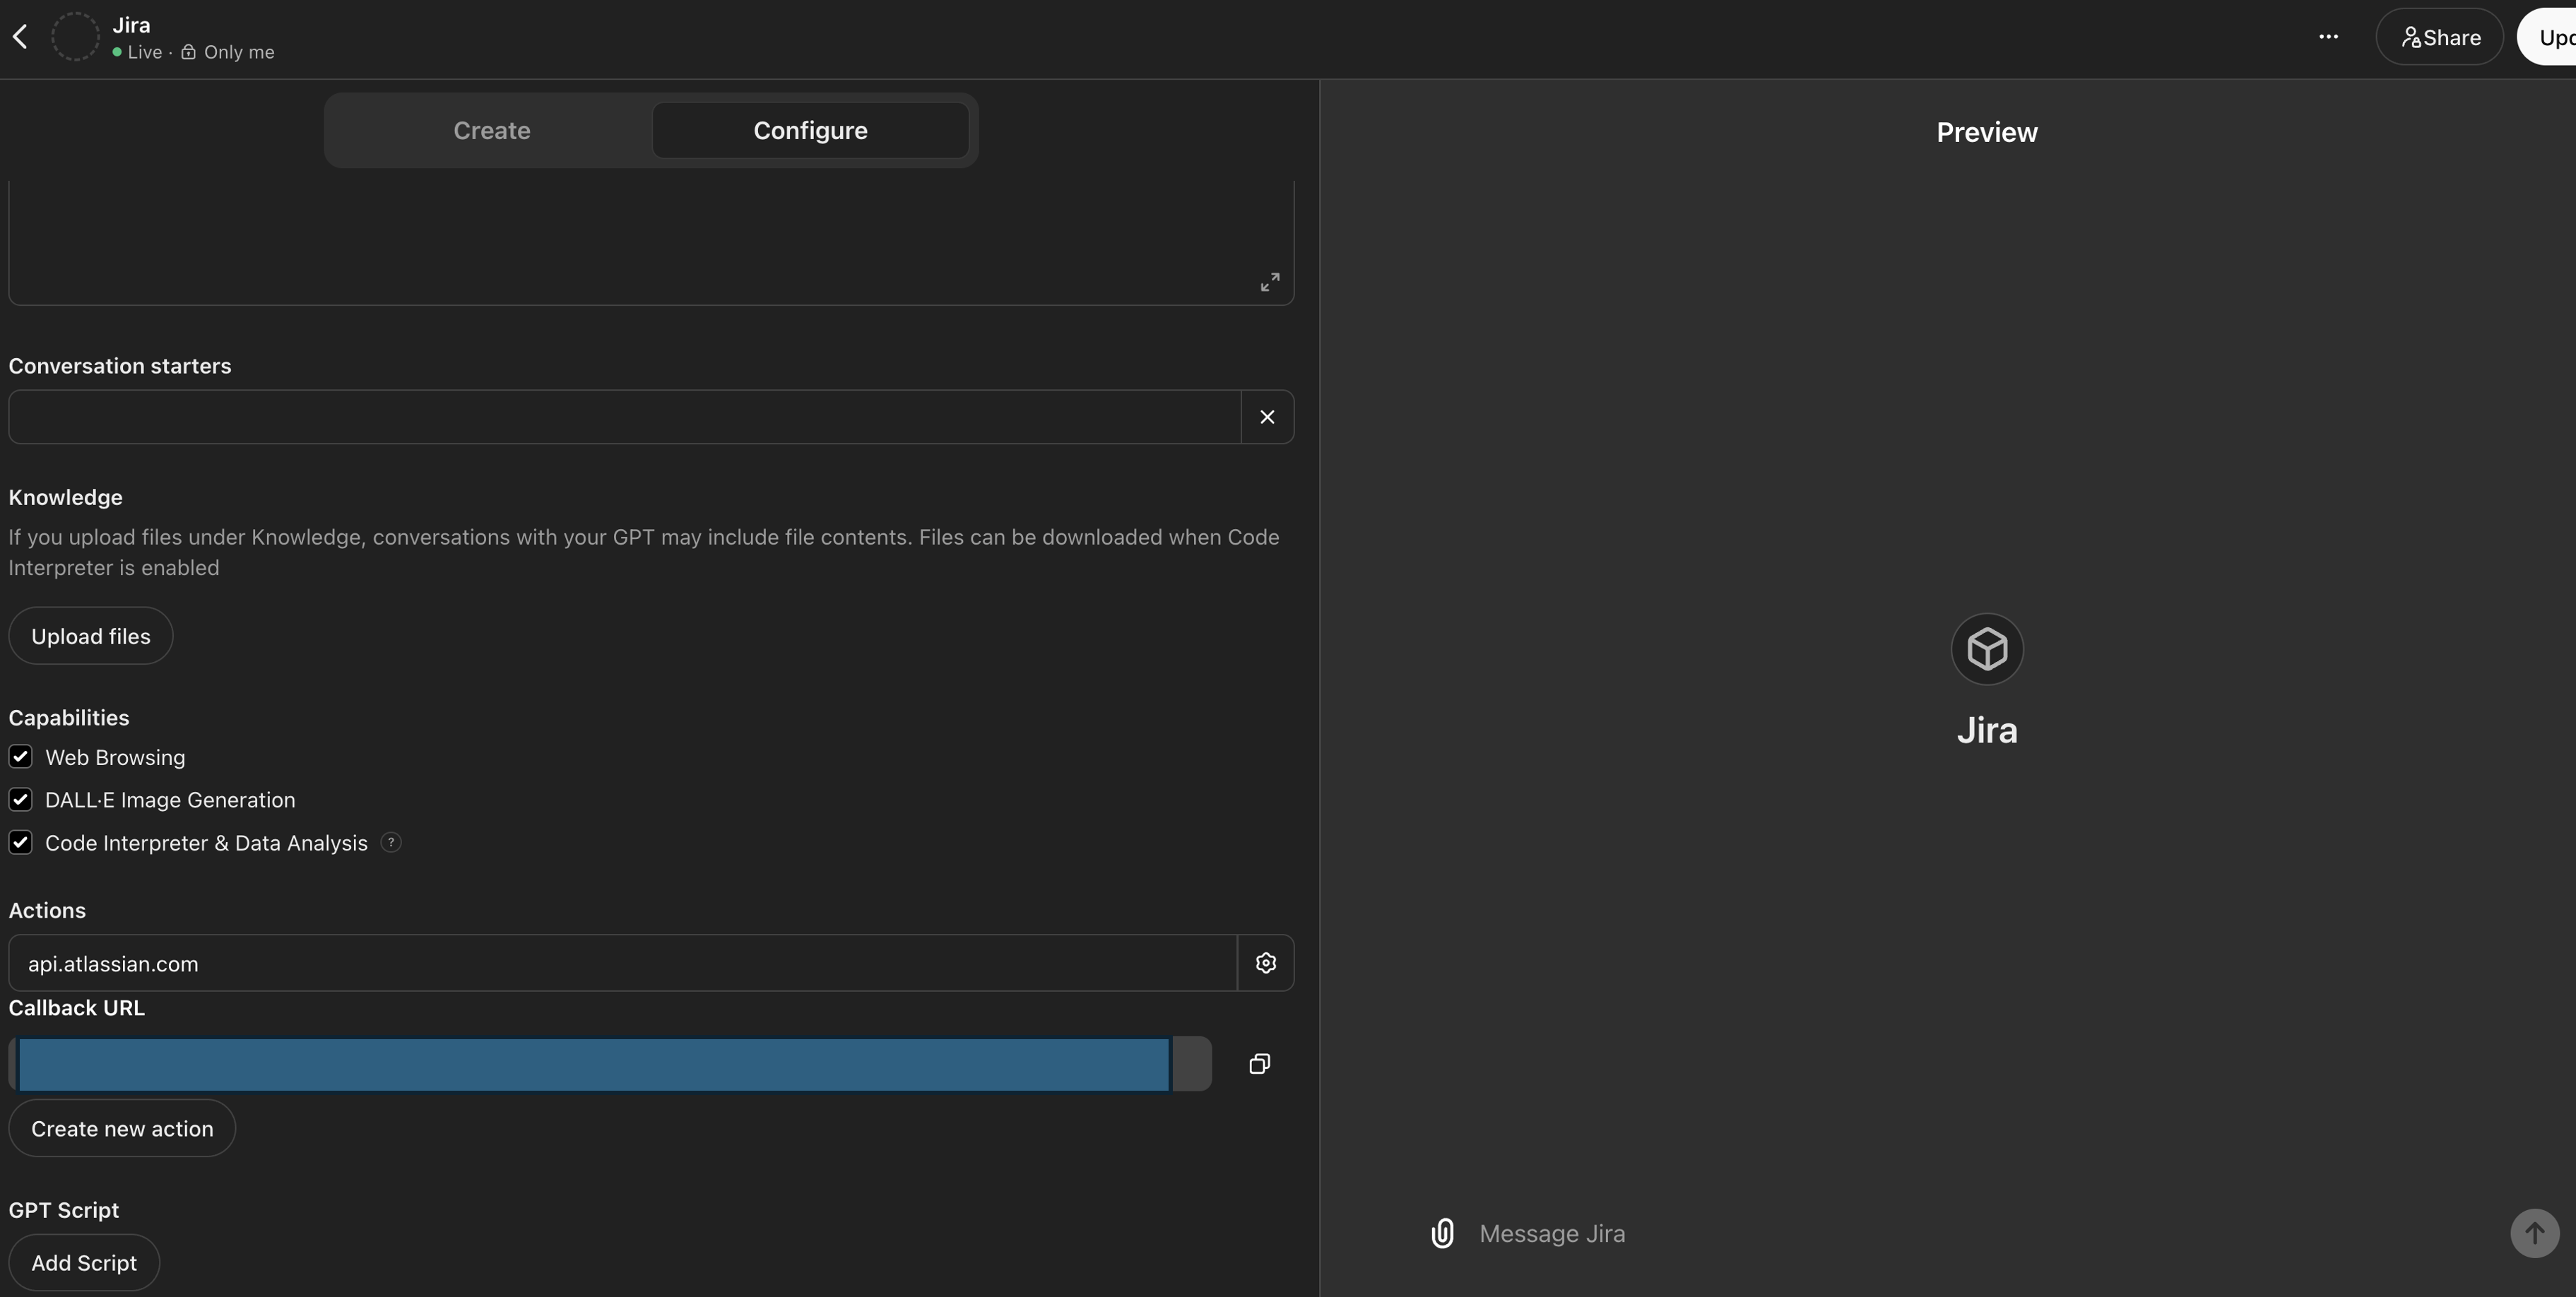
- 在 Atlassian Developer Console 的应用程序中,导航到 Authorization(授权)侧边栏选项卡,在 OAuth 2.0 (3L0) 旁边点击 Configure(配置),然后在 Callback URL(回调 URL)下添加您的回调 URL
FAQ & 故障排除
- Callback URL Error(回调 URL 错误):如果在 ChatGPT 中收到回调 URL 错误,请仔细检查回调 URL 值,因为它有时会根据对身份验证所做的任何更改而更改
您是否希望我们优先考虑某些集成?我们的集成中是否存在错误?在我们的 github 中提交 PR 或 issue,我们会查看。