此页面为开发者构建特定应用程序的 GPT Action 提供说明和指南。在继续之前,请务必先熟悉以下信息
这个特定的 GPT Action 概述了如何连接到 Outlook,Microsoft 用于电子邮件和日历事件的 Web 服务。此 Action 假定用户的上下文,并允许他们从 Outlook 发送和检索电子邮件和日历事件。
价值 + 示例业务用例
价值:用户现在可以利用 ChatGPT 的自然语言能力直接连接到 Outlook
示例用例:
- 用户可以查找当天所有的会议,并让 ChatGPT 总结这一天
- 用户可以直接通过电子邮件将 ChatGPT 的输出发送给某人
应用程序信息
应用程序关键链接
在开始之前,请查看应用程序的以下链接
应用程序先决条件
在开始之前,请确保在您的应用程序环境中完成以下步骤
- 确保您拥有访问权限和权限以在 Azure 中设置应用注册
ChatGPT 步骤
自定义 GPT 指令
创建自定义 GPT 后,将以下文本复制到“指令”面板中。 有疑问? 请查看入门示例,以更详细地了解此步骤的工作原理。
**Context**: you are specialized GPT designed to manage emails and calendar events through API connections to Microsoft Outlook. This GPT can create, read, send, and alter emails and calendar events based on user instructions. It ensures efficient handling of communication and scheduling needs by leveraging Microsoft Graph API for seamless integration with Outlook services.

**Instructions**:
- When asked to perform a task, use the available actions via the microsoft.graph.com API.
- You should behave professionally and provide clear, concise responses.
- Offer assistance with tasks such as drafting emails, scheduling meetings, organising calendar events, and retrieving email or event details.
- Ask for clarification when needed to ensure accuracy and completeness in fulfilling user requests.
- Always conclude an email by signing off with logged in user's name which can be retrieved via the User.Read endpoint
OpenAPI 架构
创建自定义 GPT 后,将以下文本复制到“Actions”面板中。 有疑问? 请查看入门示例,以更详细地了解此步骤的工作原理。
openapi: 3.1.0
info:
  title: Microsoft Graph API Integration
  version: 1.0.0
servers:
  - url: https://graph.microsoft.com/v1.0
components:
  securitySchemes:
    OAuth2:
      type: oauth2
      flows:
        clientCredentials:
          tokenUrl: https://login.microsoftonline.com/{tenant_id}/oauth2/v2.0/token
          scopes:
            https://graph.microsoft.com/User.Read: Access current user profile
            https://graph.microsoft.com/Mail.Read: Read user mail
            https://graph.microsoft.com/Mail.Send: Send mail
            https://graph.microsoft.com/Calendars.ReadWrite: Read and write user calendars
  schemas:
    UserProfile:
      type: object
      properties:
        id:
          type: string
        displayName:
          type: string
        mail:
          type: string
    UserMessage:
      type: object
      properties:
        id:
          type: string
        subject:
          type: string
        bodyPreview:
          type: string
    CalendarEvent:
      type: object
      properties:
        id:
          type: string
        subject:
          type: string
        start:
          type: object
          properties:
            dateTime:
              type: string
            timeZone:
              type: string
        end:
          type: object
          properties:
            dateTime:
              type: string
            timeZone:
              type: string
    NewEvent:
      type: object
      properties:
        subject:
          type: string
        start:
          type: object
          properties:
            dateTime:
              type: string
            timeZone:
              type: string
        end:
          type: object
          properties:
            dateTime:
              type: string
            timeZone:
              type: string
        attendees:
          type: array
          items:
            type: object
            properties:
              emailAddress:
                type: object
                properties:
                  address:
                    type: string
                  name:
                    type: string
    SendMailRequest:
      type: object
      properties:
        message:
          type: object
          properties:
            subject:
              type: string
            body:
              type: object
              properties:
                contentType:
                  type: string
                content:
                  type: string
            toRecipients:
              type: array
              items:
                type: object
                properties:
                  emailAddress:
                    type: object
                    properties:
                      address:
                        type: string
security:
  - OAuth2: []
paths:
  /me:
    get:
      operationId: getUserProfile
      summary: Get the authenticated user's profile
      security:
        - OAuth2: []
      responses:
        '200':
          description: A user profile
          content:
            application/json:
              schema:
                $ref: '#/components/schemas/UserProfile'
  /me/messages:
    get:
      operationId: getUserMessages
      summary: Get the authenticated user's messages
      security:
        - OAuth2: []
      parameters:
        - name: $top
          in: query
          required: false
          schema:
            type: integer
            default: 10
            description: Number of messages to return
        - name: $filter
          in: query
          required: false
          schema:
            type: string
            description: OData filter query to narrow results
        - name: $orderby
          in: query
          required: false
          schema:
            type: string
            description: OData order by query to sort results
      responses:
        '200':
          description: A list of user messages
          content:
            application/json:
              schema:
                type: array
                items:
                  $ref: '#/components/schemas/UserMessage'
  /me/sendMail:
    post:
      operationId: sendUserMail
      summary: Send an email as the authenticated user
      security:
        - OAuth2: []
      requestBody:
        required: true
        content:
          application/json:
            schema:
              $ref: '#/components/schemas/SendMailRequest'
      responses:
        '202':
          description: Accepted
  /me/events:
    get:
      operationId: getUserCalendarEvents
      summary: Get the authenticated user's calendar events
      security:
        - OAuth2: []
      responses:
        '200':
          description: A list of calendar events
          content:
            application/json:
              schema:
                type: array
                items:
                  $ref: '#/components/schemas/CalendarEvent'
    post:
      operationId: createUserCalendarEvent
      summary: Create a new calendar event for the authenticated user
      security:
        - OAuth2: []
      requestBody:
        required: true
        content:
          application/json:
            schema:
              $ref: '#/components/schemas/NewEvent'
      responses:
        '201':
          description: Created
          content:
            application/json:
              schema:
                $ref: '#/components/schemas/CalendarEvent'
身份验证说明
以下是关于设置 Outlook 身份验证的说明。 有疑问? 请查看入门示例,以更详细地了解此步骤的工作原理。
Azure 步骤
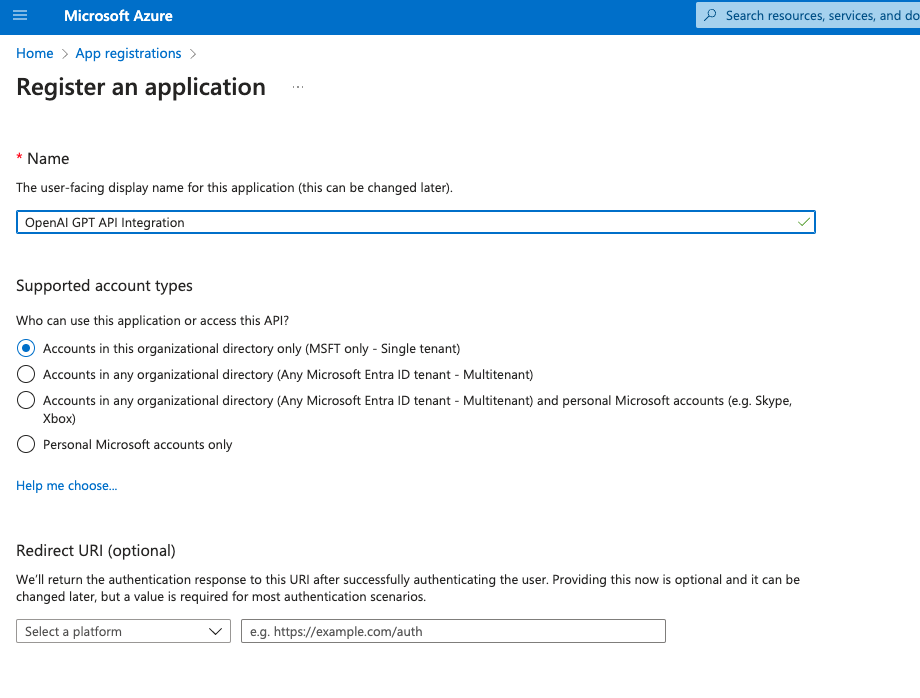
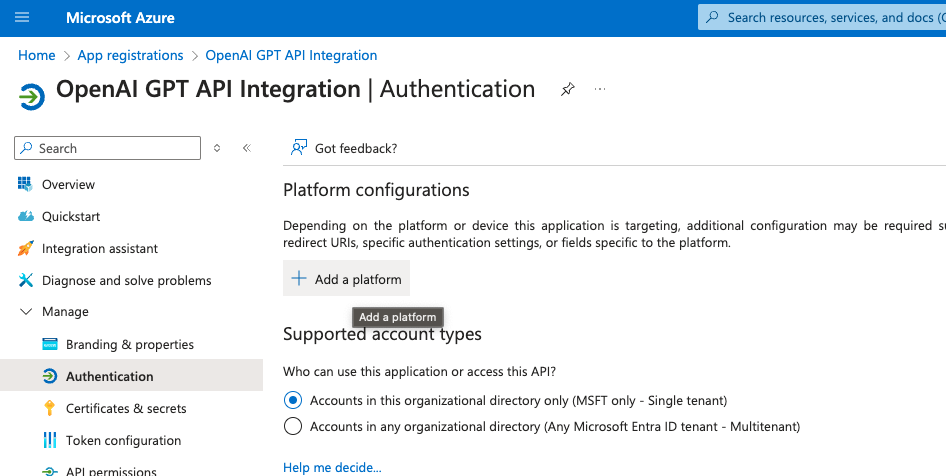
- 应用注册:第一步是在 Azure 门户 中注册一个新的应用注册,这将用于在我们的应用程序和 Azure Active Directory/Entra ID 之间集成 OAuth。只需为应用程序提供一个相关的名称,暂时将“重定向 URI”留空,因为我们稍后会回到此步骤,然后保存。
- 证书和机密:接下来我们需要生成一个客户端机密,以在 GPT 和 Azure 之间提供安全通信。在应用注册中,导航到侧边栏中的证书和机密
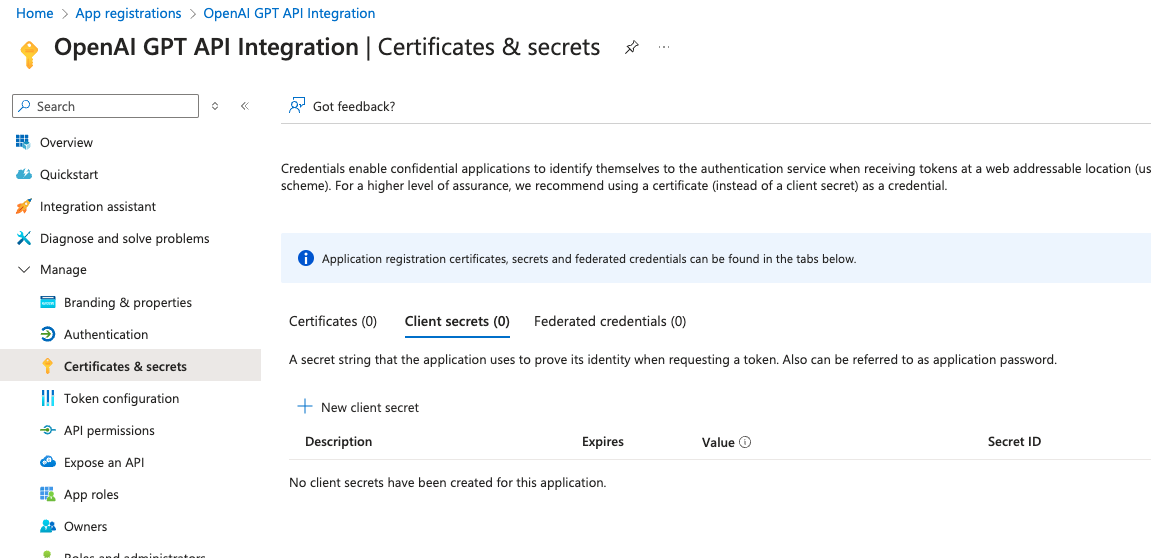
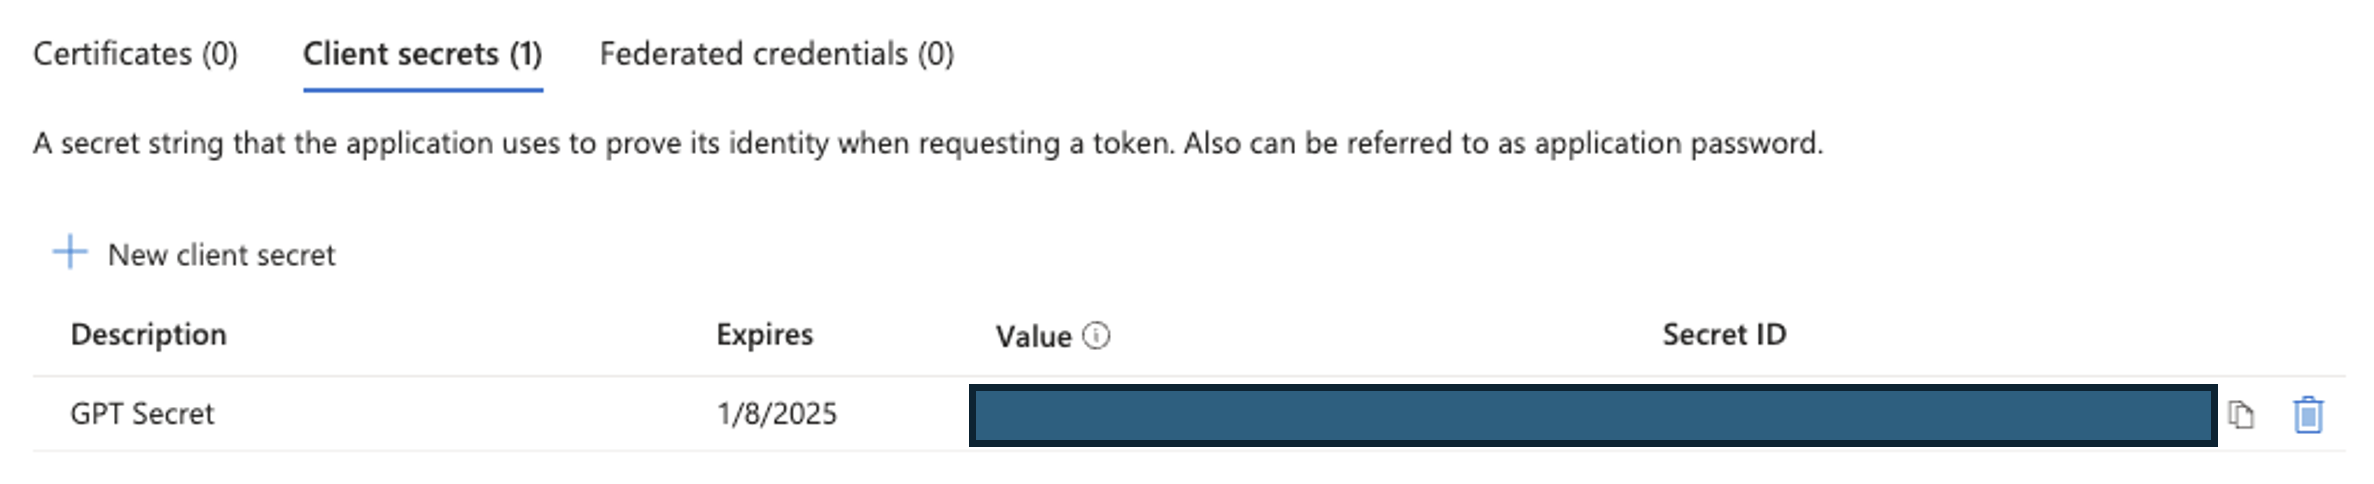
单击“新建客户端机密”,并使用所需的名称和到期日期创建一个新的客户端机密。单击“保存”将为我们提供一个在 GPT 创建中使用的机密。请务必保存 Value 字段,因为它只在创建时可见,我们稍后会需要它!
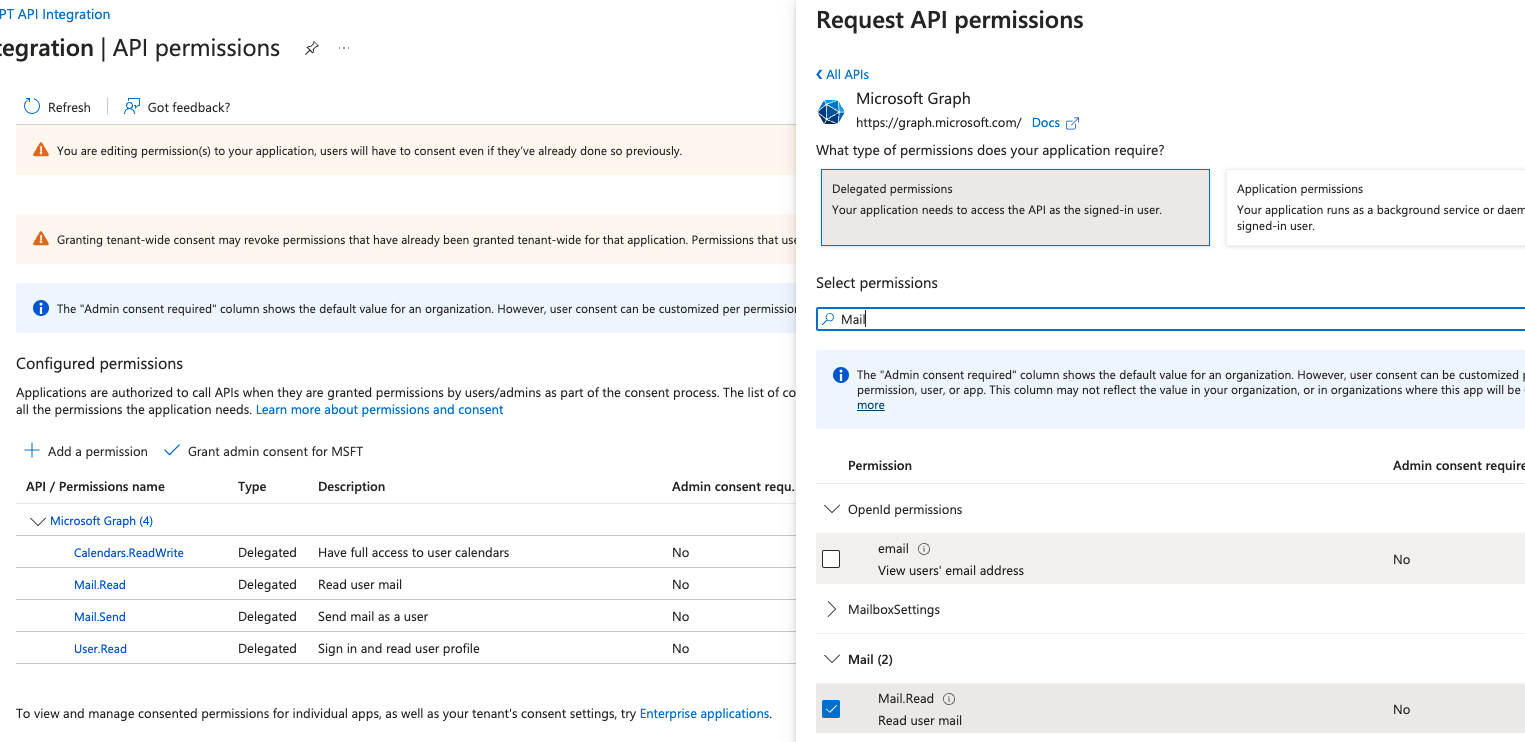
- API 权限:下一步是为集成提供执行我们特定所需操作所需的范围。在应用注册中,导航到侧边栏中的管理 > API 权限。
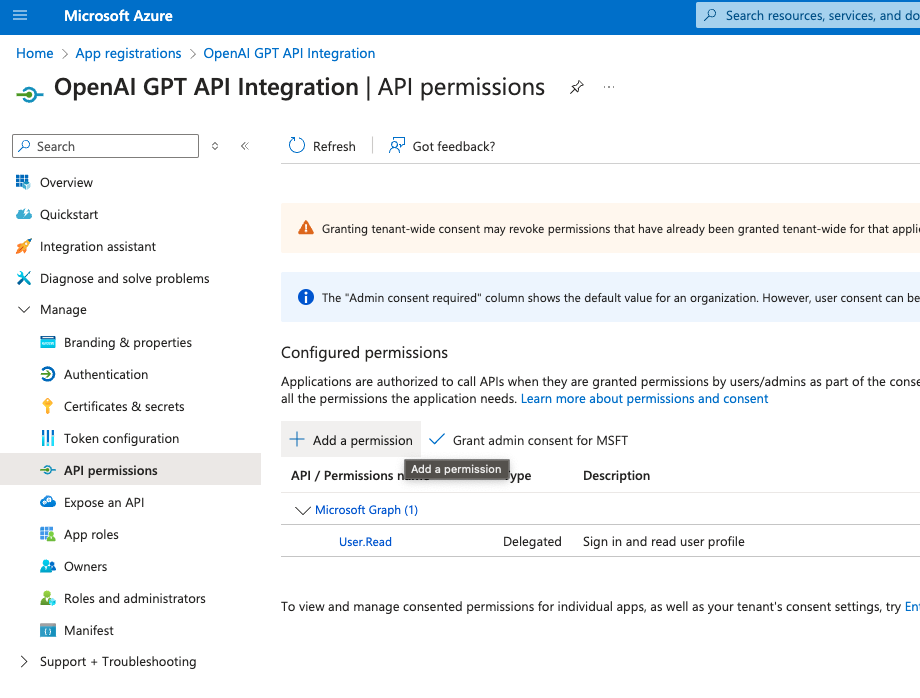
在打开的侧边菜单中,单击添加权限和Microsoft graph > 委派的权限作为选项。使用搜索栏添加以下权限
- Calendars.ReadWrite
- Mail.Read
- Mail.Send
- User.Read
在 ChatGPT 中
在 ChatGPT 中,单击“Authentication”(身份验证)并选择 “OAuth”。 输入以下信息。
- 客户端 ID:Azure 注册应用的概述页面上 应用程序(客户端)ID 下列出的值
- 客户端机密:从 Azure 步骤的步骤 2 中保存的机密 Value
对于以下两个输入,请将 <Tenant_ID> 替换为注册应用的概述页面上 目录(租户)ID 下列出的值
- 授权 URL: https://login.microsoftonline.com/<Tenant_ID>/oauth2/v2.0/authorize
- 令牌 URL: https://login.microsoftonline.com/<Tenant_ID>/oauth2/v2.0/token
- Scope: https://graph.microsoft.com/User.Read https://graph.microsoft.com/Mail.Send https://graph.microsoft.com/Mail.Read https://graph.microsoft.com/Calendars.ReadWrite
- 令牌交换方法:默认 (POST 请求)
操作后步骤
在 ChatGPT 中设置身份验证后,请按照应用程序中的以下步骤完成 Action。
- 从 GPT Action 复制回调 URL

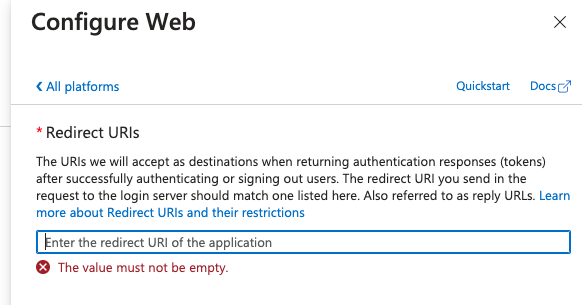
- 在 Azure 应用中,导航到 管理 > 身份验证 选项卡,单击 添加平台,选择 Web 并在 重定向 URI 下添加您的回调 URL
FAQ 和故障排除
- 回调 URL 错误:如果您在 ChatGPT 中收到回调 URL 错误,请仔细检查回调 URL 值,因为它有时会根据对身份验证所做的任何更改而更改
是否有您希望我们优先考虑的集成? 我们的集成中是否存在错误? 在我们的 github 中提交 PR 或 issue,我们将查看。