本页为开发者构建特定应用程序的 GPT Action 提供说明和指南。在继续之前,请务必先熟悉以下信息
这个特定的 GPT Action 概述了如何连接到 Snowflake 数据仓库。此 Action 接收用户的问题,扫描相关表以收集数据模式,然后编写 SQL 查询来回答用户的问题。
注意:此 Cookbook 返回 ResultSet SQL 语句,而不是不受 GPT Actions application/json 有效负载限制的完整结果。对于生产和高级用例,需要中间件来返回 CSV 文件。您可以按照 GPT Actions - Snowflake 中间件 Cookbook 中的说明改为实施此流程。
价值 + 示例业务用例
价值:用户现在可以利用 ChatGPT 的自然语言能力直接连接到 Snowflake 的数据仓库。
示例用例
- 数据科学家可以使用 ChatGPT 的数据分析连接到表并运行数据分析
- 公民数据用户可以询问有关其事务数据的基本问题
- 用户可以更好地了解他们的数据和潜在的异常
应用信息
应用关键链接
在开始之前,请查看应用程序中的这些链接
应用先决条件
在开始之前,请确保在您的应用程序环境中完成以下步骤
- 配置 Snowflake 数据仓库
- 确保通过 ChatGPT 验证到 Snowflake 的用户有权访问具有必要角色的数据库、模式和表
ChatGPT 步骤
自定义 GPT 指令
创建自定义 GPT 后,将以下文本复制到“Instructions”(指令)面板中。有疑问?请查看 入门示例,了解此步骤的详细工作原理。
**Context**: You are an expert at writing Snowflake SQL queries. A user is going to ask you a question.

**Instructions**:
1. No matter the user's question, start by running `runQuery` operation using this query: "SELECT column_name, table_name, data_type, comment FROM {database}.INFORMATION_SCHEMA.COLUMNS"
-- Assume warehouse = "<insert your default warehouse here>", database = "<insert your default database here>", unless the user provides different values
2. Convert the user's question into a SQL statement that leverages the step above and run the `runQuery` operation on that SQL statement to confirm the query works. Add a limit of 100 rows
3. Now remove the limit of 100 rows and return back the query for the user to see
4. Use the <your_role> role when querying Snowflake
5. Run each step in sequence. Explain what you are doing in a few sentences, run the action, and then explain what you learned. This will help the user understand the reason behind your workflow.

**Additional Notes**: If the user says "Let's get started", explain that the user can provide a project or dataset, along with a question they want answered. If the user has no ideas, suggest that we have a sample flights dataset they can query - ask if they want you to query that
OpenAPI 架构
创建自定义 GPT 后,将以下文本复制到“Actions”(操作)面板中。更新服务器 URL 以匹配您的 Snowflake 帐户名称 URL 加上 /api/v2,如 此处 所述。有疑问?请查看 入门示例,了解此步骤的详细工作原理。
openapi: 3.1.0
info:
  title: Snowflake Statements API
  version: 1.0.0
  description: API for executing statements in Snowflake with specific warehouse and role settings.
servers:
  - url: 'https://<orgname>-<account_name>.snowflakecomputing.com/api/v2'


paths:
  /statements:
    post:
      summary: Execute a SQL statement in Snowflake
      description: This endpoint allows users to execute a SQL statement in Snowflake, specifying the warehouse and roles to use.
      operationId: runQuery
      tags:
        - Statements
      requestBody:
        required: true
        content:
          application/json:
            schema:
              type: object
              properties:
                warehouse:
                  type: string
                  description: The name of the Snowflake warehouse to use for the statement execution.
                role:
                  type: string
                  description: The Snowflake role to assume for the statement execution.
                statement:
                  type: string
                  description: The SQL statement to execute.
              required:
                - warehouse
                - role
                - statement
      responses:
        '200':
          description: Successful execution of the SQL statement.
          content:
            application/json:
              schema:
                type: object
                properties:
                  status:
                    type: string
                  data:
                    type: object
                    additionalProperties: true
        '400':
          description: Bad request, e.g., invalid SQL statement or missing parameters.
        '401':
          description: Authentication error, invalid API credentials.
        '500':
          description: Internal server error.
身份验证说明
以下是关于使用此第三方应用程序设置身份验证的说明。有疑问?请查看 入门示例,了解此步骤的详细工作原理。
操作前步骤
在 ChatGPT 中设置身份验证之前,请在 Snowflake 中执行以下步骤。
1. 可选:为 ChatGPT 配置 IP 白名单
具有通过 IP 限制连接的网络策略的 Snowflake 帐户,可能需要为 ChatGPT 添加例外。
## Example with ChatGPT IPs as of October 23, 2024
## Make sure to get the current IP ranges from https://platform.openai.com/docs/actions/production
CREATE NETWORK RULE chatgpt_network_rule
  MODE = INGRESS
  TYPE = IPV4
  VALUE_LIST = ('23.102.140.112/28',
                '13.66.11.96/28',
                '104.210.133.240/28',
                '70.37.60.192/28',
                '20.97.188.144/28',
                '20.161.76.48/28',
                '52.234.32.208/28',
                '52.156.132.32/28',
                '40.84.220.192/28',
                '23.98.178.64/28',
                '51.8.155.32/28',
                '20.246.77.240/28',
                '172.178.141.0/28',
                '172.178.141.192/28',
                '40.84.180.128/28');

CREATE NETWORK POLICY chatgpt_network_policy
  ALLOWED_NETWORK_RULE_LIST = ('chatgpt_network_rule');
网络策略可以应用于帐户、安全集成和用户级别。最具体的网络策略会覆盖更通用的网络策略。根据这些策略的应用方式,除了安全集成之外,您可能还需要更改各个用户的策略。如果您遇到此问题,您可能会遇到 Snowflake 的错误代码 390422。
2. 设置安全集成
- 查看 Snowflake OAuth 概述:https://docs.snowflake.com/en/user-guide/oauth-snowflake-overview
- 通过 安全集成 创建新的 OAuth 凭据 - 每个 OAuth 应用程序/自定义 GPT 都需要一个新的凭据,因为 Snowflake 重定向 URI 与安全集成是 1-1 映射的
CREATE SECURITY INTEGRATION CHATGPT_INTEGRATION
  TYPE = OAUTH
  ENABLED = TRUE
  OAUTH_CLIENT = CUSTOM
  OAUTH_CLIENT_TYPE = 'CONFIDENTIAL'
  OAUTH_REDIRECT_URI = 'https://oauth.pstmn.io/v1/callback' --- // this is a temporary value while testing your integration. You will replace this with the value your GPT provides
  OAUTH_ISSUE_REFRESH_TOKENS = TRUE
  OAUTH_REFRESH_TOKEN_VALIDITY = 7776000
NETWORK_POLICY = chatgpt_network_policy; --- // this line should only be included if you followed step 1 above- 检索您的 OAuth 客户端 ID、Auth URL 和 Token URL
DESCRIBE SECURITY INTEGRATION CHATGPT_INTEGRATION;您可以在以下 3 列中找到所需的信息
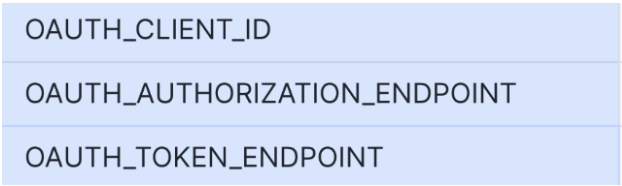
- 使用 SHOW_OAUTH_CLIENT_SECRETS 检索您的 OAuth 客户端密钥
SELECT
trim(parse_json(SYSTEM$SHOW_OAUTH_CLIENT_SECRETS('CHATGPT_INTEGRATION')):OAUTH_CLIENT_ID) AS OAUTH_CLIENT_ID
, trim(parse_json(SYSTEM$SHOW_OAUTH_CLIENT_SECRETS('CHATGPT_INTEGRATION')):OAUTH_CLIENT_SECRET) AS OAUTH_CLIENT_SECRET;
现在是 在 Postman 中测试您的 Snowflake 集成 的好时机。如果您为您的安全集成配置了网络策略,请确保它包含您用于测试的机器的 IP。
在 ChatGPT 中
在 ChatGPT 中,单击“Authentication”(身份验证)并选择“OAuth”。输入以下信息。
| 表单字段 | 值 |
|---|---|
| 身份验证类型 | OAuth |
| 客户端 ID | 来自 SHOW_OAUTH_CLIENT_SECRETS 的 OAUTH_CLIENT_ID |
| 客户端密钥 | 来自 SHOW_OAUTH_CLIENT_SECRETS 的 OAUTH_CLIENT_SECRET |
| 授权 URL | 来自 DESCRIBE SECURITY INTEGRATION 的 OAUTH_AUTHORIZATION_ENDPOINT |
| 令牌 URL | 来自 DESCRIBE SECURITY INTEGRATION 的 OAUTH_TOKEN_ENDPOINT |
| 范围 | session:role:your_role* |
| 令牌交换方法 | 默认 (POST 请求) |
*Snowflake 范围以 session:role:<your_role> 格式传递角色,例如 session:role:CHATGPT_INTEGRATION_ROLE。可以将其留空并在说明中指定角色,但是在此处添加它可以包含在 OAuth 同意请求中,有时会更可靠。
操作后步骤
在 ChatGPT 中设置身份验证后,请按照应用程序中的以下步骤完成 Action。
- 从 GPT Action 复制回调 URL
- 将您的安全集成中的重定向 URI 更新为 ChatGPT 中提供的回调 URL。
ALTER SECURITY INTEGRATION CHATGPT_INTEGRATION SET OAUTH_REDIRECT_URI='https://chat.openai.com/aip/<callback_id>/oauth/callback';常见问题解答和故障排除
- 本指南旨在说明一般概念,仅供参考。我们无法为第三方 API 集成提供全面支持。
- 如果您更新 YAML,回调 URL 可能会更改,在进行更改时请仔细检查它是否正确。
- 回调 URL 错误: 如果您在 ChatGPT 中收到回调 URL 错误,请密切注意上面的操作后步骤。您需要将回调 URL 直接添加到您的安全集成中,以便操作正确验证
- 模式调用错误的仓库或数据库: 如果 ChatGPT 调用了错误的仓库或数据库,请考虑更新您的说明,使其更明确 (a) 应调用哪个仓库/数据库,或者 (b) 要求用户在运行查询之前提供这些确切的详细信息
是否有您希望我们优先考虑的集成?我们的集成中是否存在错误?在我们的 github 中提交 PR 或 issue,我们将进行查看。